
Introduction
Azure Label Protection are Sensitivity labels that help to classify documents and emails so that everyone in the company can quickly understand how a piece of information should be handled. Once a label is applied, it stays with the file or email, even if it is downloaded, moved, or forwarded.
Applying a label is optional. You are encouraged to apply the label that best fits the content whenever you feel it's appropriate, but you will not be blocked from saving, sending, or sharing a file if you choose not to label it.
Section 1: Applying Labels to Microsoft Apps (Word, Excel, PowerPoint, etc).
The steps below are almost identical across Word, Excel, PowerPoint, etc and across Windows and Mac. Screenshots in this guide show the general location of each control; the exact wording may vary slightly by app.
- Open the document, workbook, or presentation you want to label.
- On the Home tab of the ribbon, locate and select the Sensitivity button (it may also appear as a shield icon).

Screenshot 1 Sensitivity button in Microsoft apps (in this case Word document).
3. A dropdown list of available labels will appear.
4. Select Internal from the list (or the label that best matches your content).
5. The label is applied immediately. You can confirm this by opening the Sensitivity menu again — the applied label will be shown with a checkmark.

Screenshot 2 Label already applied on the word document.
6. Save the file as usual. After the label has been applied only with justification can be removed for teh users has access to this label.
Section 2: Applying Labels to Emails in Outlook
The same labels used in Word, Excel, and PowerPoint are also available in Outlook, so you can classify emails the same way you classify documents.
2.1 Windows Outlook Desktop App
- Start a new email, or open a draft you're working on.
- On the Message ribbon, locate the Sensitivity button.
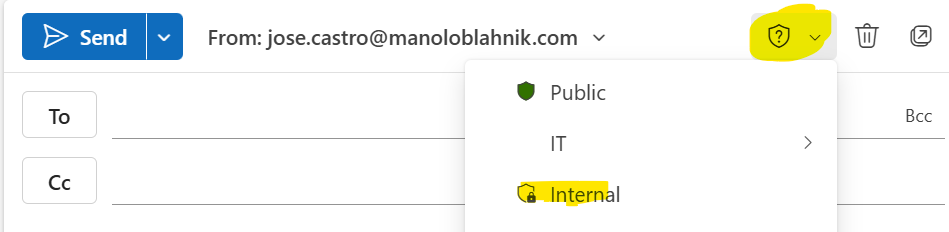
Screenshot 3 Sensitivity button in a new email (Windows Outlook).
3. Select Internal from the dropdown list (or the label that best matches your email content).
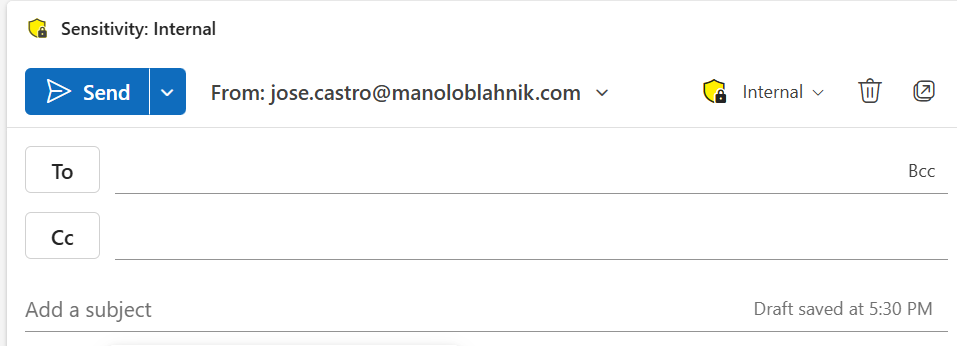
Screenshot 4 Selecting the “Internal” label in a new email (Windows Outlook).
4. The label is applied to the email. Continue writing your email and send it as usual. If there is any file attach please be aware it will automatically applied the labels to the files.
2.2 Mac Outlook Desktop
- Start a new email, or open a draft you're working on.
- On the ribbon, select the Sensitivity button.
Screenshot 5 Sensitivity button in a new email (Mac Outlook).
3. Choose Internal from the list (or the label that best matches your email content), then send your email as usual.
Frequently Questions
- Can I change a label after applying it? Yes, reopen the Sensitivity menu at any time and select a different label.
- Does labeling slow down saving or sending? No, labels are applied instantly and don't affect performance.
- What if I don't see the Sensitivity button at all? Make sure your Office app is updated to the latest version, then contact IT if the option is still missing.
- Do I have to label everything? No, labeling is optional. Use your judgment and apply a label when it feels appropriate.
Please any issue or question contact IT by following the normal process by access our Systems & IT Support portal (save this as a favourite), or Email Systems & IT Support (support@manoloblahnik.freshdesk.com) which can be found in the Global Address List in Outlook.
IT Team